A Cozy Autumn Delight: Delicious Cast Iron Apple Crisp
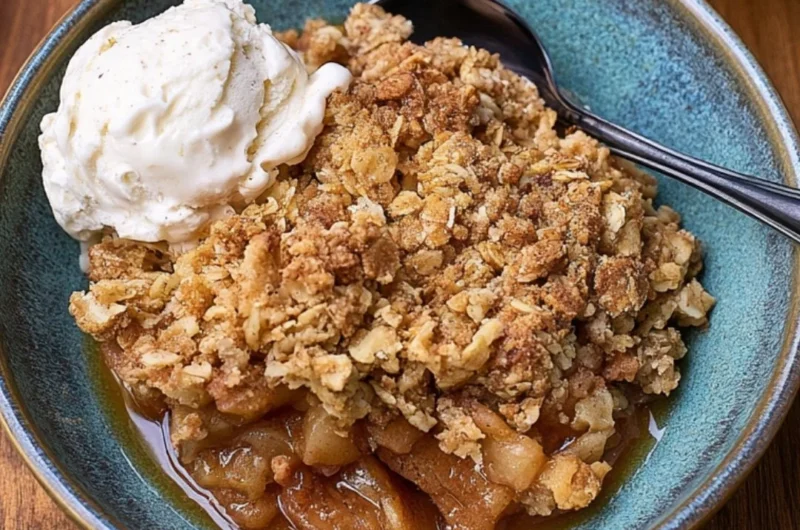
As the leaves turn golden and the air grows crisp, there’s nothing quite like the warm embrace of a homemade dessert to capture the essence of the season. Picture this: a bubbling cast iron skillet filled with tender apples, their sweet scent mingling with a fragrant spice blend, all topped with a crunchy oat topping that’s just crispy enough to satisfy. This Delicious Cast Iron Apple Crisp is more than just a recipe; it’s a comforting hug in dessert form, perfect for family gatherings or cozy nights at home.
Our memories are often woven with the aromas of freshly baked treats, and for me, nothing brings back those nostalgic feelings like this comforting apple crisp. Whether it was coming home from school to find the kitchen filled with the smell of cinnamon and baked apples or gathering around the table after a long day, this dessert evokes the warmth of shared moments.
So grab your cast iron skillet and let’s create a timeless treasure that’s destined to become a staple in your home. Trust me, this is one you’ll definitely want to pin for later!
Why You’ll Love This Recipe
- Quick and Easy: Whip this up in under an hour for an uncomplicated, delicious treat.
- Crowd-Pleasing: Perfect for family dinners or gatherings; everyone will love it.
- Seasonal Joy: Celebrate the flavors of fall with tender apples and warm spices.
- Customizable: Feel free to experiment with different nuts or add a scoop of ice cream for extra delight.
- Nostalgic Comfort: This recipe brings back memories of family gatherings, rich with love and warmth.
Gather These Simple Ingredients
To make your Delicious Cast Iron Apple Crisp, you’ll need:
- 4-5 medium apples (Granny Smith, Honeycrisp, or a blend)
- 1 tablespoon fresh lemon juice
- 1 cup rolled oats
- 1 cup all-purpose flour
- 3/4 cup brown sugar
- 1 teaspoon ground cinnamon
- 1/2 teaspoon salt
- 1/2 cup unsalted butter, melted
- 1/2 cup chopped nuts (walnuts or pecans, optional)
- Ice cream or whipped cream for serving (optional)
Let’s Make It Together
- Preheat your oven to 350°F (175°C).
- Peel, core, and slice your apples into thin wedges. Toss with lemon juice, then add 1/4 cup of brown sugar and 1 teaspoon of cinnamon. Spread the mixture in the bottom of your cast iron skillet.
- In a bowl, combine oats, flour, remaining brown sugar, salt, and melted butter. Mix until crumbly.
- Distribute the oat mixture evenly over the apples in the skillet.
- Bake for 30-35 minutes until golden brown and the apples are tender.
- Serve warm, ideally with a scoop of ice cream or a dollop of whipped cream.
Fun Ways to Customize It
- Add a Twist of Flavor: Mix in a handful of dried cranberries or raisins for an added layer of sweetness and chewiness.
- Zesty Citrus Kick: Incorporate some orange zest along with the lemon juice for a refreshing, tangy flavor.
- Nutty Delight: Swap out the nuts for your favorite nut butter mixed into the topping for an indulgent twist.
- Spiced Up: Add a pinch of nutmeg or ginger for an extra layer of warmth and spice.
Chef Emma’s Helpful Tips
- Make-Ahead Magic: You can prepare the apple filling up to a day in advance and store it in the fridge. Just add the topping before baking!
- Ingredient Swaps: If you’re short on brown sugar, coconut sugar makes a great substitute without compromising flavor.
- Storage Suggestions: Leftovers can be stored in an airtight container in the fridge for up to three days; simply reheat in the oven for a lovely warm dessert.
- Apple Slicing: For even cooking, aim for slices that are roughly the same thickness—about 1/4 inch works beautifully!
What’s Inside – Nutrition Breakdown
- Serving Size: 1/8 of the recipe
- Calories: 300
- Carbohydrates: 40g
- Sugar: 15g
- Fat: 15g
- Protein: 3g
- Sodium: 150mg
Common Questions Answered
Can I make this ahead?
Absolutely! Prepare the apple filling a day in advance and store it in the fridge until you’re ready to bake.
Can I use different ingredients?
Of course! Feel free to substitute different types of apples or incorporate your favorite nuts.
How do I store leftovers?
Keep any remaining apple crisp in an airtight container in the fridge for up to three days.
How long does it last?
When stored properly, your apple crisp will keep for about three days in the refrigerator.
A Cozy Closing Note
This Delicious Cast Iron Apple Crisp has a unique way of bringing people together, creating those cherished moments that we look back on with a smile. The combination of tender apples, richly spiced oats, and the satisfying crunch makes it a must-have seasonal dessert. So, gather your loved ones and enjoy this cozy treat that’s sure to warm your hearts and homes.
Save this Delicious Cast Iron Apple Crisp to your Pinterest board so it’s ready when you need a cozy treat!

Delicious Cast Iron Apple Crisp
- Total Time: 50 minutes
- Yield: 8 servings 1x
- Diet: Vegetarian
Description
A warm and comforting dessert made with tender apples, fragrant spices, and a crunchy oat topping, perfect for fall gatherings.
Ingredients
- 4–5 medium apples (Granny Smith, Honeycrisp, or a blend)
- 1 tablespoon fresh lemon juice
- 1 cup rolled oats
- 1 cup all-purpose flour
- 3/4 cup brown sugar
- 1 teaspoon ground cinnamon
- 1/2 teaspoon salt
- 1/2 cup unsalted butter, melted
- 1/2 cup chopped nuts (walnuts or pecans, optional)
- Ice cream or whipped cream for serving (optional)
Instructions
- Preheat your oven to 350°F (175°C).
- Peel, core, and slice your apples into thin wedges. Toss with lemon juice, then add 1/4 cup of brown sugar and 1 teaspoon of cinnamon. Spread the mixture in the bottom of your cast iron skillet.
- Combine oats, flour, remaining brown sugar, salt, and melted butter in a bowl. Mix until crumbly.
- Distribute the oat mixture evenly over the apples in the skillet.
- Bake for 30-35 minutes until golden brown and the apples are tender.
- Serve warm, ideally with a scoop of ice cream or a dollop of whipped cream.
Notes
You can prepare the apple filling up to a day in advance. Leftovers can be stored in an airtight container in the fridge for up to three days.
- Prep Time: 15 minutes
- Cook Time: 35 minutes
- Category: Dessert
- Method: Baking
- Cuisine: American
Nutrition
- Serving Size: 1 serving
- Calories: 300
- Sugar: 15g
- Sodium: 150mg
- Fat: 15g
- Saturated Fat: 9g
- Unsaturated Fat: 6g
- Trans Fat: 0g
- Carbohydrates: 40g
- Fiber: 3g
- Protein: 3g
- Cholesterol: 30mg